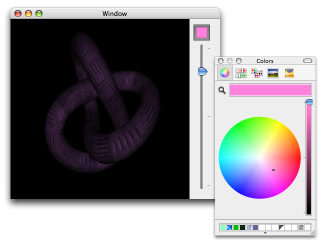
This tutorial aims to show how quickly and easily you can get OGRE running on Mac OS X in your own interface.
The very bare bones basics to get OGRE running.
- Open XCode and create a new Cocoa Application. Once done drag the Ogre.framework into the project's frameworks group.
- To make the app self contained. Add a new Copy Files Build Phase that copies into frameworks, and add the Ogre.framework to it.
- Create a subclass of NSObject OgreController in Interface Builder and create the files.
- Delete the default window and instantiate the OgreController in Interface Builder.
- Link the File's Owner to the OgreController as its delegate, so that we get the applicationDidFinishLaunching notification.
- Rename OgreController.m to OgreController.mm so that it compiles ObjC++.
- Enter this basic code outline for OGRE in the OgreController.mm file:
#import "OgreController.h"
#import "Ogre/Ogre.h"
using namespace Ogre;
@implementation OgreController
- (void)applicationDidFinishLaunching:(NSNotification *)notification
{
std::string mResourcePath = [[[NSBundle mainBundle] resourcePath] cString];
// Create a new root object with the correct paths
Root *mRoot = new Root(mResourcePath + "/plugins.cfg", mResourcePath + "/ogre.cfg", mResourcePath + "/Ogre.log");
mRoot->setRenderSystem(mRoot->getAvailableRenderers()->front());
// use pbuffers not frame buffers because of driver problems
mRoot->getRenderSystem()->setConfigOption("RTT Preferred Mode", "PBuffer");
// Show a configure box and exit if user clicked cancel
if(!mRoot->showConfigDialog())
return;
// Initialise
RenderWindow* mWindow = mRoot->initialise(true);
SceneManager *mSceneMgr = mRoot->createSceneManager(ST_GENERIC, "my scene manager");
// Create the camera, node & attach camera
Camera *mCamera = mSceneMgr->createCamera("PlayerCam");
SceneNode* camNode = mSceneMgr->getRootSceneNode()->createChildSceneNode();
camNode->attachObject(mCamera);
mWindow->addViewport(mCamera);
}
@end
- Lastly create a new empty file called plugins.cfg. This is the configure file that tells OGRE what plugins to load. Enter "Plugin=RenderSystem_GL" in the blank file. And make sure it is included in the Copy Bundle Resources build phase.
- Enjoy the results:


- Download it here: OgreTutorial1.zip.
A black screen is not very exciting. OGRE can do much more, we provide a start by adding some simple resources and creating something to look at.
- First add the resources to the project for the knot: knot.material knot.mesh and MtlPlat2.jpg These are the material defenition file, the 3D mesh and the texture for the entity we will create. Make sure all three resources are included in the Copy Bundle Resources build phase.
- Next we add the code to load the resources, after initalising the Root object.
// Add resource locations -- looking at folders recursively
ResourceGroupManager::getSingleton().addResourceLocation(mResourcePath, std::string("FileSystem"), ResourceGroupManager::DEFAULT_RESOURCE_GROUP_NAME, false);
ResourceGroupManager::getSingleton().initialiseAllResourceGroups();
- Lastly we create a light and an OGRE entity out of the knot at (0,0,-500).
// Create a light
mSceneMgr->setAmbientLight(ColourValue(0, 0, 0));
mSceneMgr->createLight("MainLight");
// Add a object, give it it's own node
SceneNode *objectNode = mSceneMgr->getRootSceneNode()->createChildSceneNode();
Entity *knot = mSceneMgr->createEntity("knot", "knot.mesh");
objectNode->attachObject(knot);
objectNode->setPosition(Vector3(0, 0, -500));
- Looking better:

- Download it here: OgreTutorial2.zip.
At the moment the 3D view only redraws as you resize the window. To make it move, we add a timer that causes some animation and updates the window.
- Add a timer to fire calling renderFrame every 50th of a second:
// create a timer that causes OGRE to render at 50fps
[NSTimer scheduledTimerWithTimeInterval:0.02 target:self selector:@selector(renderFrame) userInfo:NULL repeats:YES];
- Add the method renderFrame in awakeFromNib that renders a single frame and updates the object. Notice I've globalised objectNode.
- (void)renderFrame
{
Ogre::Root::getSingleton().renderOneFrame();
objectNode->rotate(Vector3(0, 1, 0), Radian(0.01));
}
- Download it here: OgreTutorial3.zip.
OGRE can fit seamlessly in your own interface, inbetween all sorts of controls with multiple views.
- Open up the MainMenu.nib file again, and create a new window, filling it with a custom view that stretches with the window. Make sure the window is set to be visible on launch.
- Create a new class OgreView by subclassing NSView and set the class of the new view you created to OgreView. Throw in some other interface bits for fun.

- Add an ogreView outlet to the OgreController class in Interface Builder connecting it up to the newly created view. Also add the outlet to the OgreController header file.
- You will need to import the Ogre/OgreOSXView.h header file to reference the OgreView class.
- Replace this code that automatically creates windows
// Show a configure box and exit if user clicked cancel
if(!mRoot->showConfigDialog())
return;
// Initialise
RenderWindow* mWindow = mRoot->initialise(true);
with this code that uses a OgreView we pass in ourselves
// Initialise without an automatically created window
mRoot->initialise(false);
// Ask for a new window passing in the ogreView in our nib file
NameValuePairList misc;
misc["externalWindowHandle"] = StringConverter::toString((size_t)ogreView);
mRoot->createRenderWindow("ogre window", 0, 0, false, &misc);
RenderWindow *mWindow = [ogreView ogreWindow];
- Have some fun with the interface. Hook up the components with bindings to control different aspects of the scene.
- Add the timer to other run loops to get animation whilst using controls.
NSTimer *renderTimer = [NSTimer scheduledTimerWithTimeInterval:0.02 target:self selector:@selector(renderFrame) userInfo:NULL repeats:YES];
[[NSRunLoop currentRunLoop] addTimer:renderTimer forMode:NSEventTrackingRunLoopMode];
- Play

- Download it here: OgreTutorial4.zip.
- Here is another example that uses bindings to provide a list of materials: OgreNibDemo.zip.
- It is also possible to easily subclass OgreView to provide your own interactions: OgreNibSubclassDemo.zip.